
Raspberry Pi 3 Model B+ setup , board tour, HDMI connection, SSH and tightvnc demo
This blog is in continuation of my series of popular evaluation platforms . Please SUBSCRIBE to YouTube channel Embedkari to access detail video related to this and other important topics.
This is one of my favorite evaluation platform because it can be used as a mini-computer and sufficient to test many advance embedded features.
Model : Raspberry Pi 3 Model B+
- CPU: Broadcom BCM2837B0, Cortex-A53 , 64-bit SoC @1.4 Ghz
- WiFi: 2.4GHz and 5 GHz
- Bluetooth: 4.2
- Ethernet : Fast , PoE
- USB: 4 USB 2.0 ports
- Video & Audio : 1 HDMI port, MIPI DSI display , MIPI CSI camera port, 4 pole stereo output and composite video port
- SD card : Micro SD
- Power :
- 5V-2.5A DC via micro USB connector
- 5V DC via GPIO connector
- PoE requires separate PoE HAT
Quick Board Tour

- Camera, HDMI, mirco-usb , Display

- 3.5mm Audio/Video Jack

- Ethernet , USB (4-ports)

- SD card

- Look from other side

Where can I find Raspbian image ?
- Download Raspbian image from this link .
How to program the image to SD card ?
- Format microSD card with SD card formatter from this
- Use etcher utility to program the image in microSD
How to test whether SD card boots or not ?
- Connect HDMI cable with TV which supports HDMI port.
- Connect one external 5V 2.5A DC Power supply through micro-usb port

How to use Raspberry Pi with PC/laptop ?
- Insert SD card in PC. You should be able to see boot folder in the microSD drive. If that is in drive K, do following
- C:> echo >K:\ssh
- This should create a file ssh in microsd boot folder and required to enable SSH first time .
- Enable sharing in your WiFi properties . I am assuming that it is connected with WiFi router

- Let settings be at default

- Make sure LAN has static IP address as follows

- Check whether Raspberry Pi is active in Advance IP Scanner tool or not
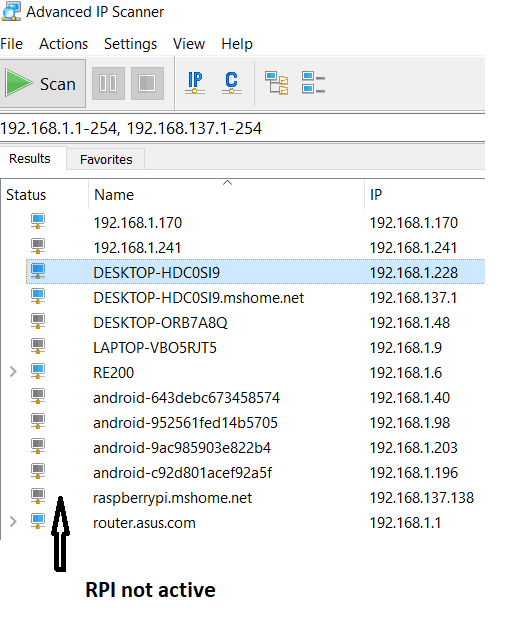
- If the icon is not blue , It is not active as shown above. In that case disable sharing , click OK

- Wait for around 1 min , enable the sharing and click OK. It should be active in few seconds as shown below

- Ping raspberrypi.mshome.net
C:\Users\Sanjay>ping raspberrypi.mshome.net

Pinging raspberrypi.mshome.net [192.168.137.205] with 32 bytes of data:
Reply from 192.168.137.205: bytes=32 time<1ms TTL=64
Reply from 192.168.137.205: bytes=32 time<1ms TTL=64
- If ping works, open putty and start SSH as shown below

- I selected NO in the warning message below

- You will get login prompt. Default username is pi and password is raspberry

How to access Raspberry Pi using VNC ?
- Install tightvncserver in Raspberry Pi using SSH terminal
- sudo apt-get install tightvncserver
- Install tightvnc viewer in Desktop from this link.
- Start vncserver in Raspberry Pi terminal

- Start tightvnc viewer in PC and put raspberrypi.mshome.net:1

- Authenticate with password

- You should be able to see the Raspberry Pi screen on your PC

Reference :

Please subscribe to YouTube channel Embedkari for additional embedded related stuff.