
This is the starting point for forthcoming Linux discussion. This can help Engineers to start learning basics of Linux. This is discussed in detail in this video.
Linux Installation Procedure :
It is always recommended to do Linux installation with the assistance of IT administrator. One should read each instruction carefully before starting the process. You may go through all the options discussed here
You may find step-by-step installation guide at the link given above as Read the installation instructions
What are the options available ?
1: A dedicated desktop for Linux is always the best option . Alternatively one can go for dual-boot option i.e. Windows and Linux both
2: One can also use VirtualBox simulation option under Windows. It has the advantage of creating several virtual m/cs of different Ubuntu versions provided you have enough memory resources. Many times you may need to work on a particular Ubuntu version for compatibility with a particular BSP.
3: If you are not confident in installing Ubuntu in either of the methods described above, You may still try it with bootable USB
Creating a bootable USB stick on windows
Requirements:
-
A USB stick of at least 2gb memory. I will recommend to buy a faster one as shown in this page. If you are using mobile, You need to click on the menu bar on top right.
-
An open source and free tool for writing in the usb (rufus)
-
MS Windows XP or a higher version
-
An Ubuntu ISO file
Step 1: Download the Ubuntu ISO file from the link as shown below.

Step 2: Download Rufus from the website as shown below

Step 3: To configure your USB in Rufus :-
-
Launch Rufus
-
Insert the USB device
-
Your device is automatically detected by Rufu
-
If more than one device is detected then select the correct one from device field’s drop-down menu
-
Select the ISO file by clicking on the select option
-
Keep the Partition scheme set as MBR , for best compatibility with newer hardware set Target system as UEFI. However, if you need to use the USB stick with older hardware, change this BIOS or UEFI
-
Click on the start option
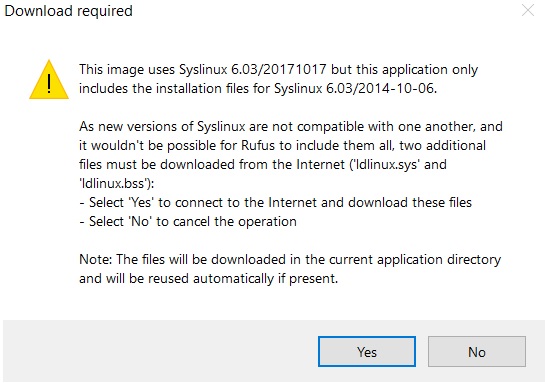
If the image uses a higher version of Linux then additional files are downloaded by Rufus. In such cases click yes to continue (As shown)
8. You will then be alerted that Rufus has detected that the Ubuntu ISO is an ISOHybrid image. This means the same image file can be used as the source for both a DVD and a USB Pen drive without requiring conversion. Select write in ISO image mode and click on OK

If the device contains data a warning will be given, as the data present will be destroyed. If you are sure that there is no valuable data in USB stick , Click on OK to continue .
9. The ISO files are then copied on the USB, this process should take around 5 mins. When the process is completed click on the Close button. Your bootable USB is ready

How to use the Bootable USB ?
-
Insert the USB into the system
-
Turn on the system and go to the boot menu (you can usually go to the boot menu by pressing F2 or ESC key while booting)
-
Select the UEFI option for booting

-
The Ubuntu boot menu appears , select the option ‘ Try Ubuntu without installing’

-
The system restarts and the Ubuntu desktop screen appears

You may also like to read Virtualbox Folder Sharing
I am trying to improve usability of my blog site. Did you find this blog post helpful ? If so, Could you help to grow my readership by sharing this blog post ? Please subscribe to youtube channel Embedkari for further detail.
Please suggest a link or video for running linux using virtualbox VM, could not find any tutorial lecture providing proper steps to do so.
We have posted few videos at Embedkari youtube channel. We have Operating system course as well for in-depth training.